
Overview
This document describes the steps required by the customer, to assign specific roles to the respective users. User Management enables the customer to define specific roles to a role as well as other configurations (assign rights) of the Quick eSelling modules as per the requirement of their role; add a new user as well as assign a specific role to a user.
The intended audience of this document are the QeS customers.
About 'User Management' Menu Option
- Login to Quick eSelling and go to the Settings > User Management. This opens the User Management window which consists of two sections: User Management and Manage User Roles.
- The User Management section allows you to add a new user.
- The Manage User Roles section allows you to select the role for a specific user and also assign rights to that selected role.
Managing User Roles
Quick eSelling allows its customers to assign desired roles and respective access rights to the users created.
To assign User Roles and assign access rights to a specific User Role:
- Go to Settings > User Management menu > Manage User Roles tab, to view the below screen that lists QeS’s modules and provides you the choice of selecting the type of access rights (None or Read Only or Full Access) to the selected User Role.
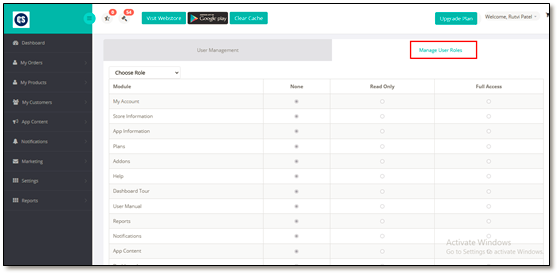
Figure 1: Settings > User Management > Manage User Roles
On clicking Add Single Product button, opens the Add Product window. To add a product, you need to configure/enter the details in various tabs such as Product Details, Product Description, Product Images, Product Attributes and Group Pricing.
- Choose Role: Firstly, select the User Role from the drop down option, which you want to assign to a user and to whom, you want to assign the below access rights.
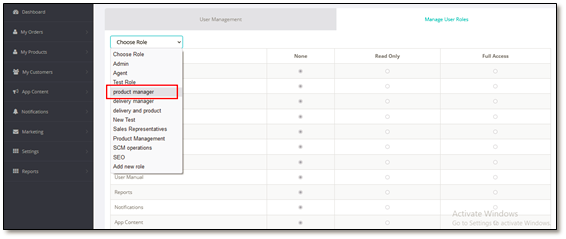
Figure 2: Select the User Role to be assigned to a User
-
Select the respective radio buttons against the modules as per your requirement or choice and assign the access rights to this selected User Role.
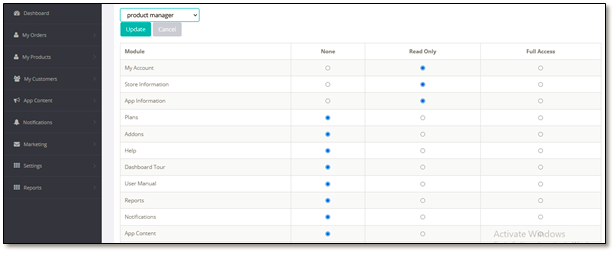
Figure 3: Assigning the access rights to the selected User Role
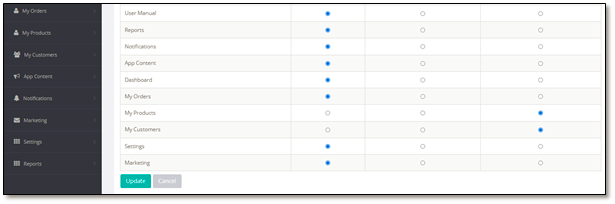
Figure 4: assigning the access rights to the selected User Role (contd.)
- Click Update button to update the selected User Role.
Adding a New User
- Go to Settings > User Management menu > User Management section > Add New User button.
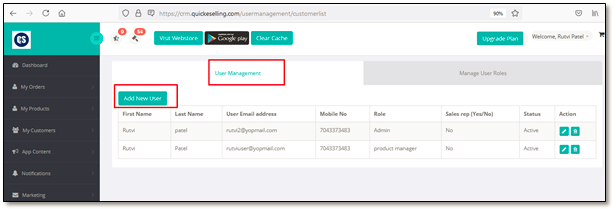
Figure 5: User Management > Add New User
- Clicking Add New User button opens the Add New User window that enables you to create a new user.
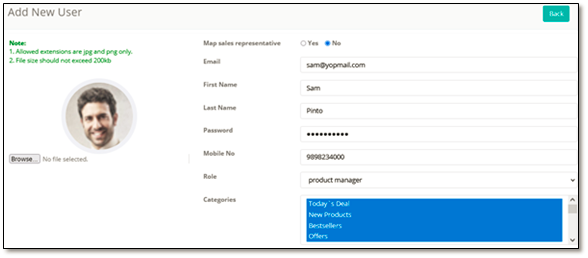
Figure 6: Add New User window
- On this window, enter the below details:
- Map Sales Representative: If you want to map this newly created user with your Sales Representative, then select Yes. By default, it is selected as No. You can select Yes and map the Sales Representative if the newly created user is assigned any roles related to Sales.
- Email: Enter the email address of the user.
- First Name: Enter the first name of the new user to be created.
- Last Name: Enter the last name of the new user to be created.
- Password: Enter the password for this email ID of the new user to be created.
- Mobile No: Enter the mobile number of the new user to be created.
- Role: Choose the role from the drop down list, to be assigned to this new user. The roles are system generated as per its modules. You cannot add, delete or edit a role.
Note: These roles are the same roles listed under the Choose Role field in Manage User Roles window.
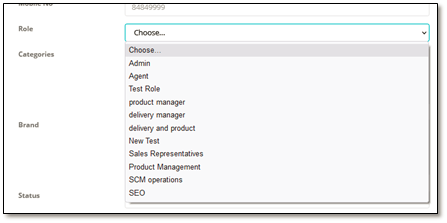
Figure 7: Roles > drop down option > Different roles defined in the system
- Categories: Select only those categories that you want to be accessed by this user. Hence, when this user logs in by these credentials, he will be able to see only those categories which you have selected here.
- Brand: Select only those brands for which you want to give access to this user.
- Status: Select the status for this user: Active or Inactive.
Note: Only .jpg and .png file extensions are allowed for the image and the file size should not exceed 200KB.
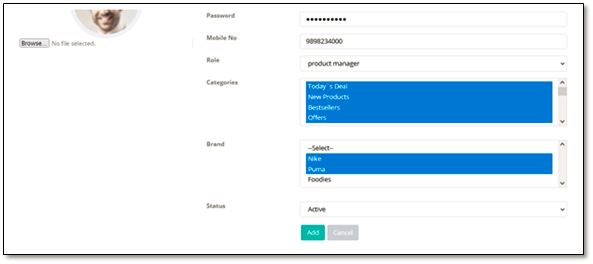
Figure 8: Add New User (contd.)
- Click Add button to add this new user.
- As soon as you click Add button, this user gets created and listed in the users’ list, as shown below.
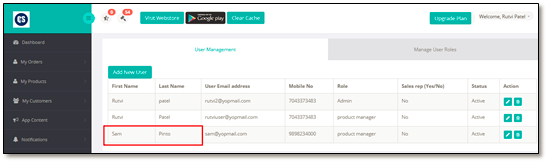
Figure 9: The above created new user ‘Sam Pinto’ gets listed here with the assigned role ‘product manager’
- Click
 (Edit) button to edit the selected user. This opens the Add New User window of the selected user and allows you to make any changes.
 - Similarly, click
 (Delete) button to delete the selected user from the list.
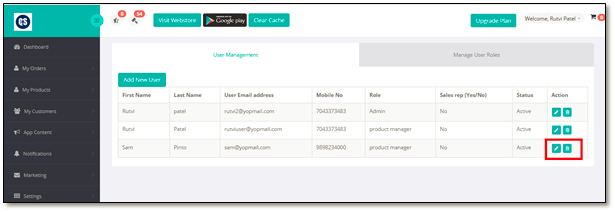
Figure 10: ‘Edit’ and ‘Delete’ the selected user
- Hence, a new user is created, whom a specific User Role as well as respective access rights are assigned.
- Now, when your user logs in the QeS with the above login credentials, he will be able to see only those modules that you have assigned in User Management window. See Figure 11 and Figure 12.
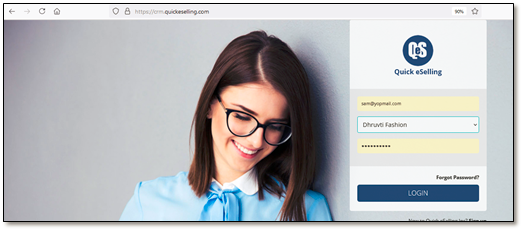
Figure 11: Logging with the newly created user (Sam Pinto)
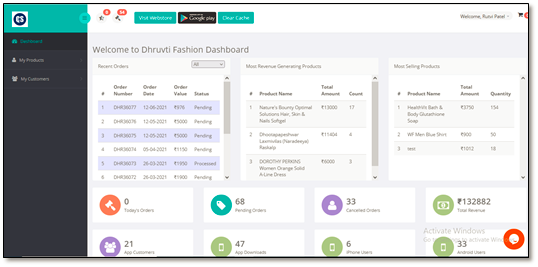
Figure 12: The left side of the window displays only those modules for which ‘full control’ rights given
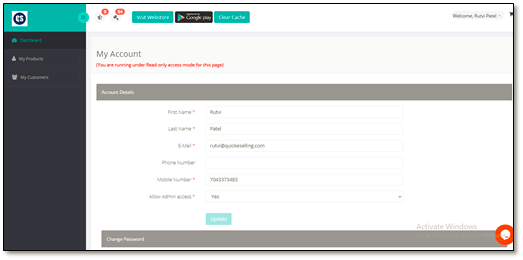
Figure 13: ‘Read Only’ access rights assigned to ‘My Account’
Comments
0 comments
Please sign in to leave a comment.