
Overview
This article describes the steps required by the customer, to create Web Content, Web Banner and Blogs for the QeS Application.
About 'App Content' Menu Option
App Content menu option (module) works for both mobile application and website; and it consists of sub-options such as Content, Web Banners and Blog.
This article will walk you through the below topics/features of the App Content menu option:
Adding 'Content Page'
To add a 'Content Page'
- Login to Quick eSelling and go to the App Content > Content to open the Content page. The Content page displays a table consisting the various pages that are visible on the left hand panel of the application and footer of the web store.
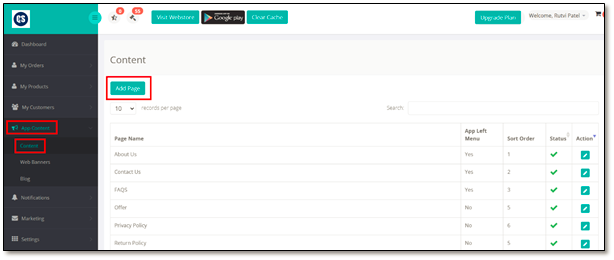
Figure 1: Settings > Mobile App Theme
- As shown in the above figure, the table displays list of Content Pages with the details such as Page Name, App Left Menu, Sort Order, Status and Action.
- Page Name: Displays the name of the app’s as well as website’s content page.
- App Left Menu: Displays whether this Content Page is to be displayed on the left menu of the mobile app or not.
- Sort Order: Displays the order in which the content page is to be displayed on the app and web store.
- Status: Displays the status (active or inactive) of the content page.
- Action: Click the
 icon in order to edit the content page’s details. This will open the Edit Page window.
- Click Add Page button to add a new content page on your online store. . This opens a new page – Add Page. On this page, enter the below details for creating a new content page.
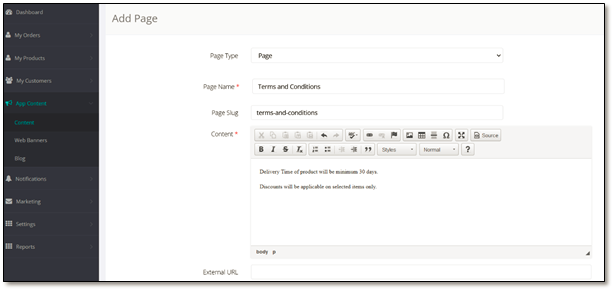
Figure 2 Add Page > Creating a new page
-
- Page Type: Select the type of page to be added on the mobile app or web store: Page (content) or Category Page or Popup This page will be visible on the left panel of mobile application and at the footer of the web store.
- Page Name: Enter the name of the Page to be added.
- Page Slug: Enter the part of the URL that you want to be used as slug, the URL must be alpha numeric and 2 alpha numbers must be separated by a hyphen.
- Content: Enter the content details to be added for the newly added Page.
- External URL: Enter any external URL to which you want this Page to be opened or directed.
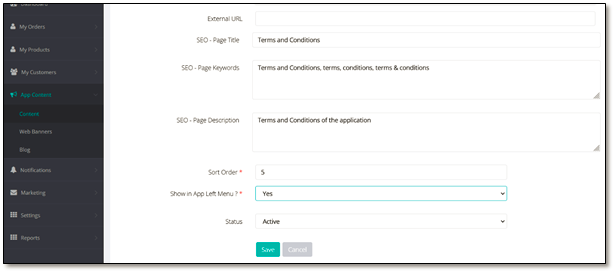
Figure 3: Add Page > Creating new page (cont.)
-
- SEO – Page Title: Enter the Search Engine Optimization (SEO) Title preferred for this newly added Page that can help the customers for better reach out.
- SEO – Page Keywords: Enter the various key words (comma separated) that can serve as SEO keywords for this newly added Page on the site.
- SEO – Page Description: Enter the various descriptive key words or phrases (comma separated) that can serve as SEO for this newly added Page’s description for better search.
- Sort Order: Enter the order in which you want to display this newly added Page on your online store. . For example, if you enter 1, then the newly added Page will be shown first in the list.
- Show in App Left Menu?: Select Yes from the drop down menu option, if you want this Page to be displayed on the mobile app’s Home page’s Left Menu. By default, its selected as No.
- Status: Select the Content Page’s status, that is, Active or Inactive. If you want to get this newly added Page displayed (or activate) on your online store, then select Active.
- Click the Save button to save the above details and create the Page.
- Once you create the Page (here, Content Page), it appears as below on the mobile application.
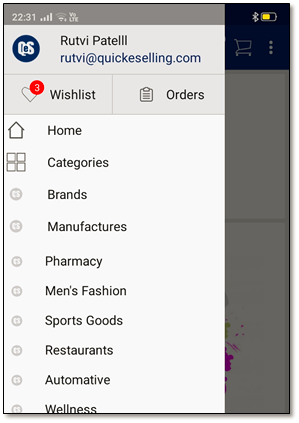
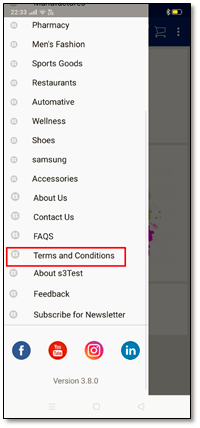
Figure 4: Newly added ‘Content Page’ gets listed on the left side menu of the app
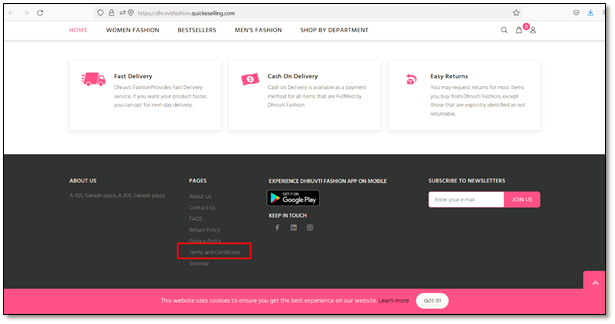
Figure 5: Newly added ‘Content Page’ appears at the footer of the web store
Adding a 'Website Banner'
In order to make your website more appealing, you can add banners to it.
To add a Website Banner:
- Login to Quick eSelling and go to the App Content > Web Banners option to open the Website Banners
The Website Banners page displays a table consisting the details of all the created Website Banners such as Image, Title, Sort Order, Status and Action.
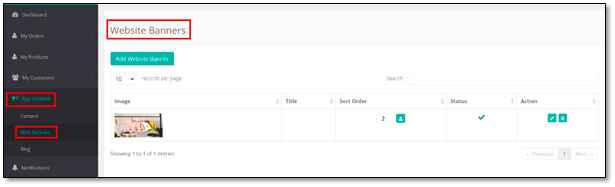
Figure 6: App Content > Web Banners option > Website Banners page
-
- Image: This column displays the Banner’s image.
- Title: This column displays the Title (name) of the Banner.
- Sort Order: Displays the order in which the Banner is to be displayed on the website.
- Status: Displays the status of the Banner – Active (in use/displayed) or Inactive (not in use/not displayed).
- Action: Displays the
 (Edit icon) and
  (Delete icon). Edit icon allows you to edit the Banner and opens the respective Banner’s edit page. Delete icon allows you to delete the selected Banner from the list.
- Click the Add Website Banner button to open the Add Website Banners page and add a new Banner. On this page, enter the below details for creating a new Website Banner.
- Add Title: Enter the desired title name for the Website Banner to be added.
- Upload Banner: Browse an image for the Banner. The banner size depends upon which website theme is been selected by customer. The standard banner size is 1000px*600px.
- Add Content: If you want, you can enter the content for this banner.
- Tag Line: If you prefer, you can enter a unique tag line for this banner, to be displayed on the website.
- Button Text: If you want any text to be displayed as ‘button’ over the Banner then enter that text here.
- Sort Order: Enter the order in which you want to display this newly added Website Banner on the website. For example, if you enter 1, then the newly added Banner will be shown first on that website page.
- Select Category: Select the desired Product Category from the drop-down list. You will be redirected to the selected category’s products.
- Status: Select the Banner’s status, that is, Active or Inactive. If you want to show this banner on the website’s Home page, then select Active.
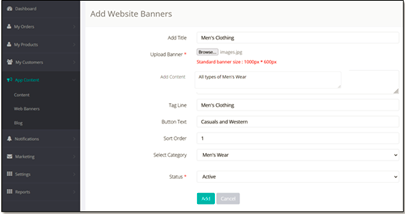
Figure 7: Add Website Banners > Adding a New Banner
- Click the Add button to save the above details and create the Website Banner.
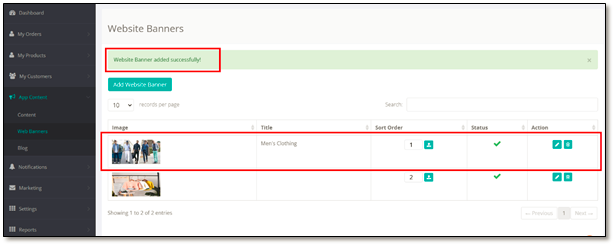
Figure 8: New Website Banner Added
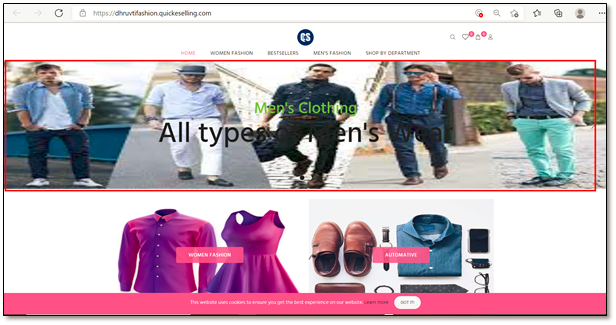
Figure 9 The newly added Website Banner (Men’s Clothing) appears on the online web store
Adding a 'Blog'
Quick eSelling provides the facility of publishing blogs on its web store / website.
Note: Blogs are available for Web store only.
To add a Blog
- Login to Quick eSelling and go to the App Content > Blog option to open the Blogs
The Blog page displays a table consisting the details of all the created Blogs such as Title, URL, Image, Sort Order, Status and Action.
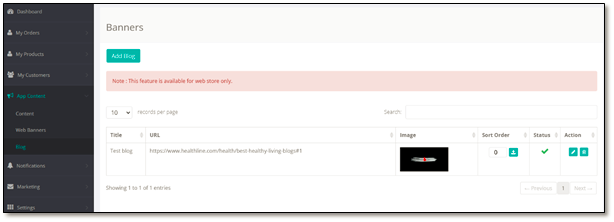
Figure 10: App Content > Blog
-
- Title: Displays the title of the blog.
- URL: If entered, displays the URL of the related blogs to which you want to redirect the customers to.
- Image: Displays the uploaded image of the respective blog.
- Sort Order: Displays the order in which the Blog is to be displayed on the web store.
- Status: Displays the status of the Blog – Active (in use/displayed) or Inactive (not in use/not displayed) on the web store.
- Action: Displays the
 (Edit icon) and
  (Delete icon). Edit icon allows you to edit the Blog and opens the respective Blog’s edit page. Delete icon allows you to delete the selected Blog from the list.
- Click the Add Blog button to open the Add Blog window, as shown in below figure. On this page, enter the below details for creating a new Blog.
- Title: Enter the title of the blog to be added.
- Page Slug: Enter the part of the URL that you want to be used as slug, the URL must be alpha numeric and 2 alpha numbers must be separated by a hyphen.
- URL: If you prefer, you can enter any URL of the related blogs to which you want to redirect the customers to.
- Short Description: Enter the short description of the blog here.
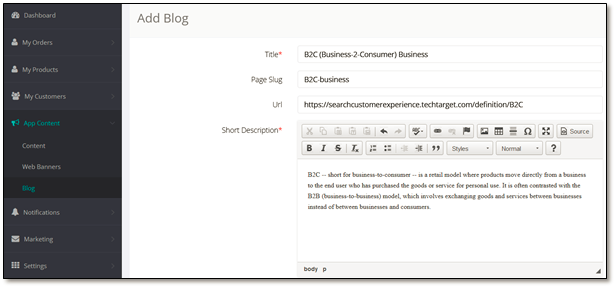
Figure 11: Add Blog
-
- Content: Enter the detailed content of the blog.
- Image: Browse the related image for this newly added blog. Only jpg, jpeg, png, ico, bmp file formats can be uploaded.
- Sort Order: Enter the order in which you want to display this newly added Blog on the web store. For example, if you enter 1, then the newly added Blog will be shown first on that web store.
- Status: Select the Blog’s status, that is, Active or Inactive. If you want to get this newly added Blog displayed (or activate) on the web store, then select Active.
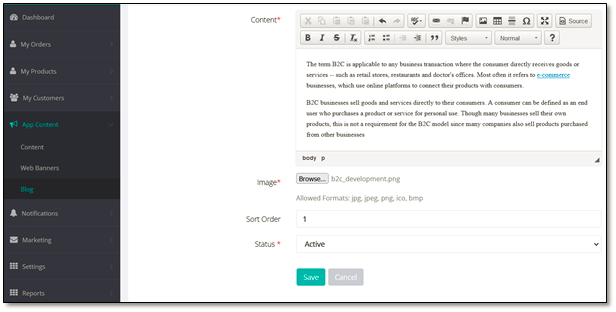
Figure 12: Add Blog (contd.)
- Click Save button to save the above details and add this new blog.
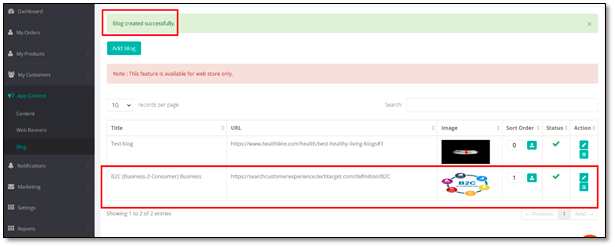
Figure 13: Blogs > Newly added Blog appears in the table.
Comments
0 comments
Please sign in to leave a comment.