
Overview
This article provides with the steps that will help the customers to design their QeS Mobile application’s Home page. A mobile application’s theme comprises of ‘banners’ and ‘categories’.
Theme controls look and feel of your app and makes it more attractive. It helps in creating brand for your app.
The intended audience of this document are the QeS customers.
This article will walk you through the below topics/features:
- Setting Up Mobile App’s Theme
- Adding a New Theme
- Creating a ‘Category’ Home Page/Creating Sub Home Page
Pre-requisites
- Must have registered yourself on Quick eSelling and created your own store.
- Must have the Products added in your store along with images (minimum 6 to 10 products).
- Must have differ Product Categories created.
- Must have Banners created.
Setting Up Mobile App's Theme
- Login to Quick eSelling and go to the Settings > Mobile App Theme. This opens the App Theme Setup window. The App Theme Setup window allows you to setup mobile application’s Home screen.
As shown in below figure, the App Theme Setup window displays Theme Name, Type (either Homepage or Category), is Default, Status, Created and Action.
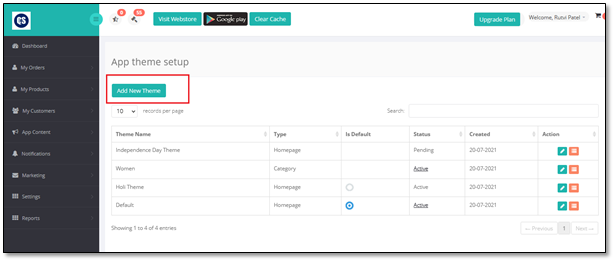
Figure 1: Settings > Mobile App Theme
-
- Theme Name: Displays the name of the mobile theme added.
- Type: Displays the type of the mobile theme: Homepage or Category.
- Is Default:
 icon displays that the selected theme is set as default mobile theme.
 - Status: Displays the status of the theme: Pending or Active.
- Pending: If no Sections are added or enabled (published) then, the status of that theme appears as Pending.
- Active: If minimum 3 Sections are added and enabled (published), then, the status of that theme appears as Active.
- Created: Displays the date on which the theme is created.
- Action: Displays two actions to be performed: Edit Theme (See Editing a Theme topic) and Update Theme (See Updating the Theme (Adding the Sections))
Updating the Theme (Adding the Sections)
To update or customize theme as per your choice, you need to add sections to the selected theme. Here, Sections consist of Banners and Categories that appears on a Home page of your mobile theme.
- On App Theme Setup screen, select the Default theme and click
 (Add/Update Theme) button to update the selected ‘Default Theme’. This opens the Create Your Own Theme – Default screen.
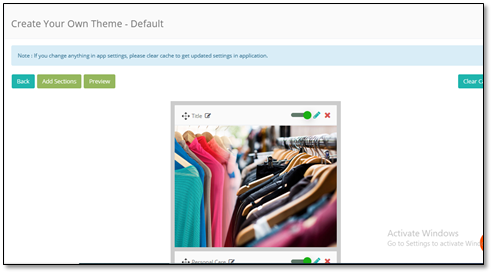
Figure 2: Create Your Own Theme (by default, already some sections – Title and category is added)
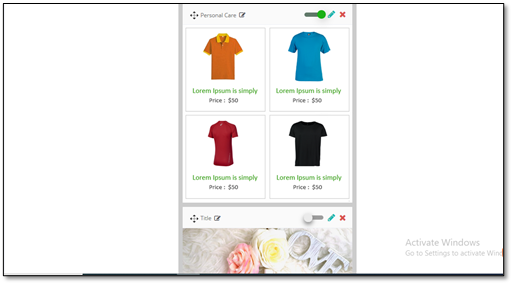
Figure 3: Create Your Own Theme (continuation)
-
As shown in above figures, for Default Theme, the default sections (that is, under Title) are already there. But, if you want to change these sections as per your own choice, click Add Sections button.
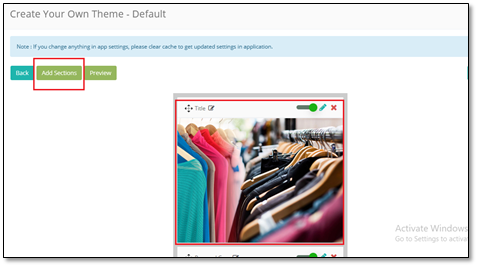
Figure 4: Create Your Own Theme > Add Sections
- On clicking the Add Sections button, the Select Additional Sections screen opens up displaying different sections available/provided by the system, hence, this screen enables you to select the section of your choice.
Note: It is mandatory to select minimum three sections for making the theme active.
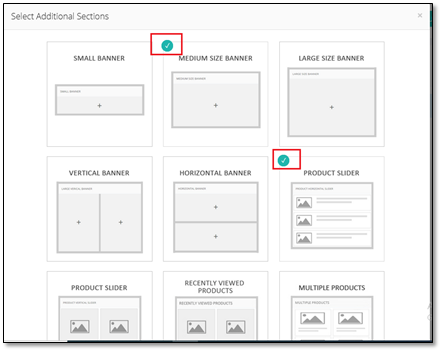
Figure 5: Select Additional Sections
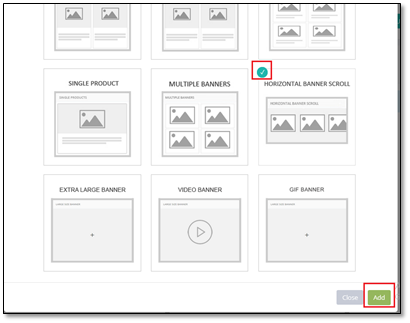
Figure 6: Select Additional Sections (continuation)
- As shown in above figures, click on the section of your choice (ticked in above figures) and click Add button to add/use these selected sections.
Here, the sections selected are: Medium Size Banner and Horizontal Banner Scroll (Banners – if you want to display the product banners on the Home page) and Product Slider (if you want to display the products of some Category on the Home page).
- On clicking Add button, these selected (ticked) sections gets added to the default theme page, as shown in below figure.
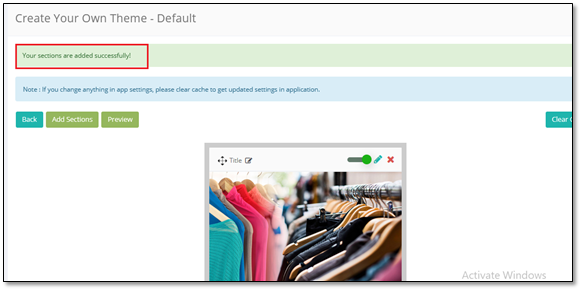
Figure 7: Selected Sections added successfully at the end
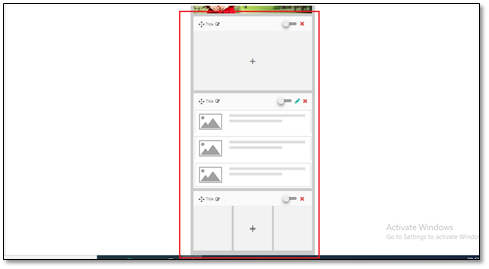
Figure 8: The selected Sections are added at the end of the ‘default theme’
- Now, add images to each added sections, one-by-one.
- For Banners section: On the Banners’ section, click the + sign to add the banner’s image. On clicking the plus sign, opens the related window. For example, here for Medium Banners, opens the Medium Size Banners window.
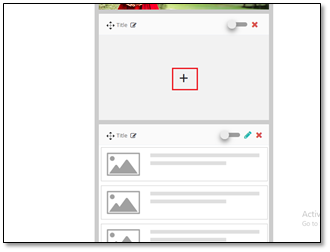
Figure 9: Click + sign to add images to the Banner
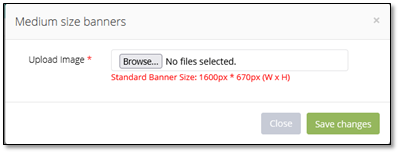
Figure 10: Medium Size Banners
- In Upload Image field, select the related image file and click the Save Changes button to save the selected file.
Note: The image file should not exceed the Standard Banner Size: 1600px * 670px (W x H).
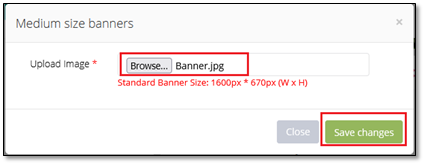
Figure 11: Image selected > click ‘Save Changes’
- On clicking the Save Changes button, the Banner’s image gets uploaded on the theme page, as shown below.
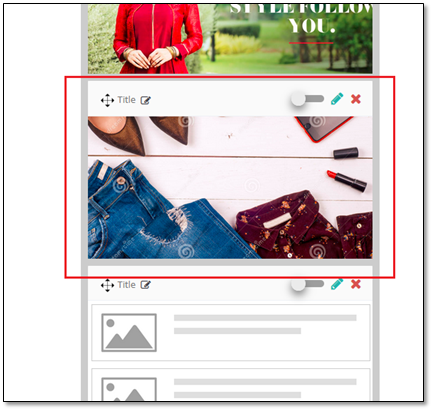
Figure 12: Banner Section added
- For Product Slider Section: On this or any such Category sections, click the
 Edit icon to add image to the Category, as shown below. This opens up to the Add Category window.
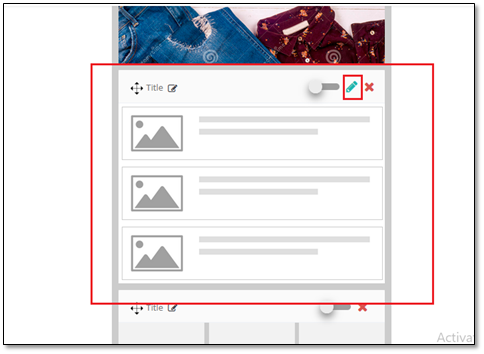
Figure 13: Adding Category image
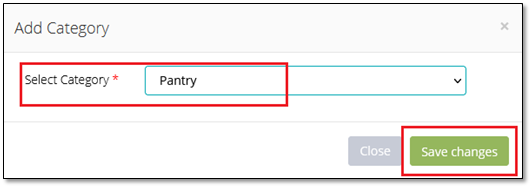
Figure 14: Select the desired category and click ‘Save Changes’
- After selecting the Category, click the Save Changes button. Hence, the selected Category will appear on the default theme page, as shown in below figure.
Note: Make sure that your Product Category has products (minimum 6 to 10 products) with Product Images. In case, the selected category don’t have any product, the system will prompt you with a warning message, as shown below.
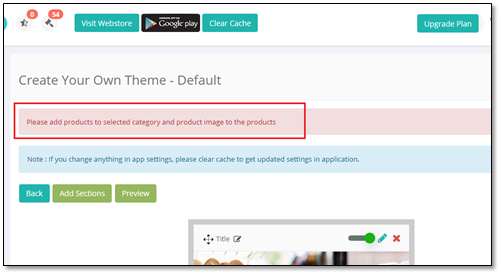
Figure 15: System warning message> if a Product Category has no products and product images
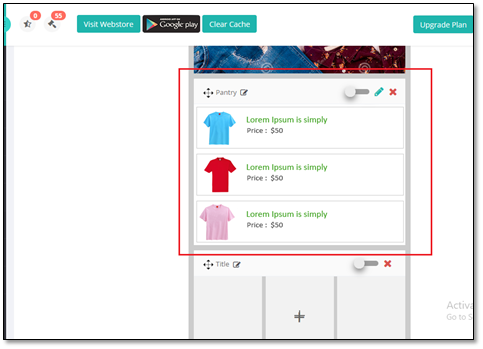
Figure 16: Selected ‘Pantry’ Category on the ‘Product Slider’ section
- As shown in above figure, though being selected Pantry category, the relevant images are not visible here. You need to enable the selected category, only then, this will be seen on mobile application (in Preview as well as in the Mobile).
See Enabling the Banner Theme section.
- Horizontal Banner Scroll: Similarly, on the next selected section, that is, Horizontal Banner Scroll, click the + sign to add three images to this Banner. This opens the Horizontal Banner Scroll window.
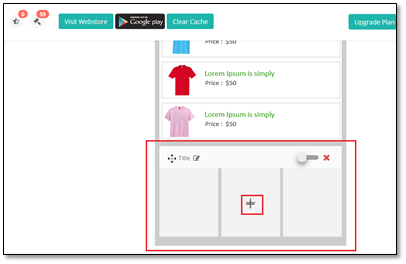
Figure 17: Horizontal Banner Section
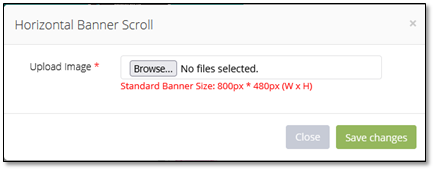
Figure 18: Horizontal Banner Scroll
- In Horizontal Banner Scroll, you need to upload three banner images. If not uploaded, the application will prompt you with the below warning message.
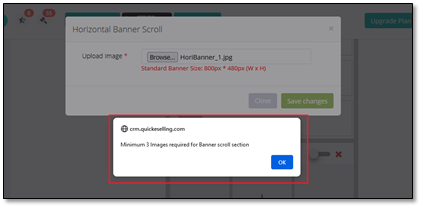
Figure 19: Warning message of selecting
- Once you upload 3 Banner images, click the Save Changes button.
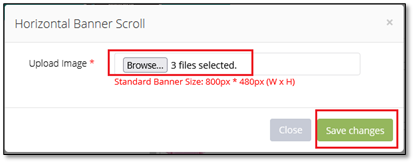
Figure 20: Uploaded 3 images for Banner
- If the images meets the standard banner images’ sizes, the images will be saved. Till you enable this Banner section, it won’t be reflected. See Enabling the Added Sections section.
Updating the Added Sections
Once you upload all the selected Sections in the Default Theme, you must do the following in order to get these reflected on your Mobile Application, as expected.
- Updating the Title of the Banner Section
- Enabling the Added Sections
- Editing the Added Banner Section
Updating the Title of the Banner Section
- Click the
 edit symbol besides the Title of the Banner Section. This allows you to edit the title and enter your own Banner’s Title.
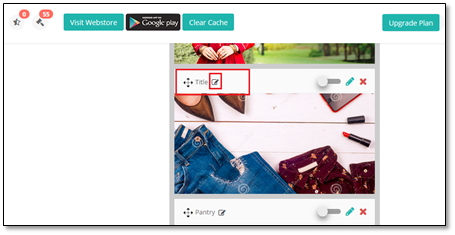
Figure 21: Click the ‘edit’ button
- Enter the Title of the Banner and click Save button.
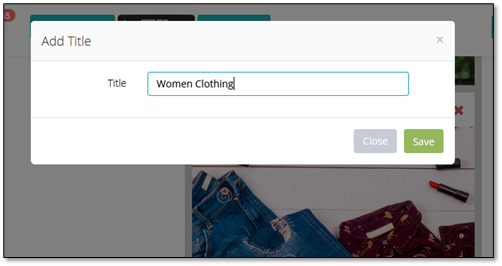
Figure 22: Enter the required title to the Banner section
- On clicking the Save button, the title appears on that Banner section on the default theme page. But, it will get reflected on the Preview as well as mobile application Home page only after you enable it. See Enabling the Added Sections section.
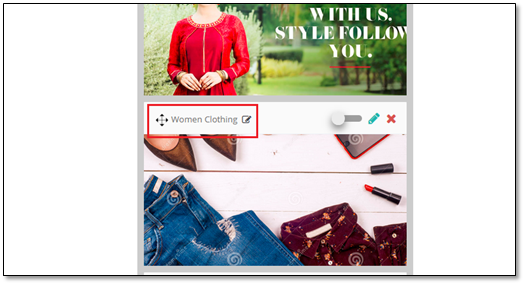
Figure 23: Title – ‘Women Clothing’ updated on the Default Theme page
Enabling the Added Sections
- Slide the (
 )option to enable (
 ) the selected Banner and visible on the Preview as well as Mobile application’s Home page.
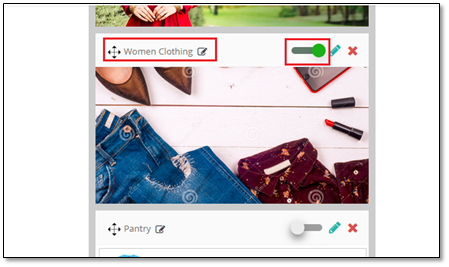
Figure 24: Enabling the Banner
- Click the Preview button on this page to get a preview of this enabled Banner. This will open the Preview screen, as shown below:
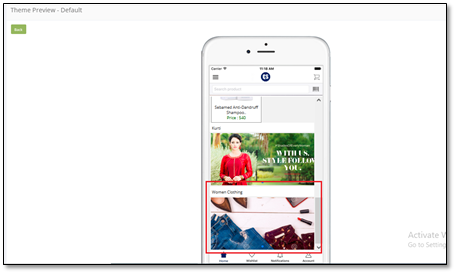
Figure 25: Preview of Banner
- Clear Cache to see these changes (added Banner) on your mobile application’s Home page.
- Similarly, the Product Slider or Horizontal Banner Scroll sections do not display the related and correct images on the default theme page, unless you enable that section. By default, it shows the pattern in which the images will be displayed on the theme.
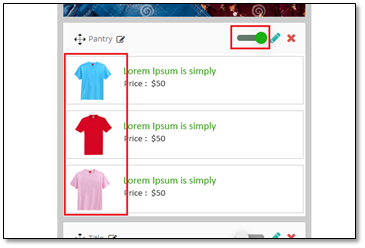
Figure 26: ‘Enabled’ the Product Slider
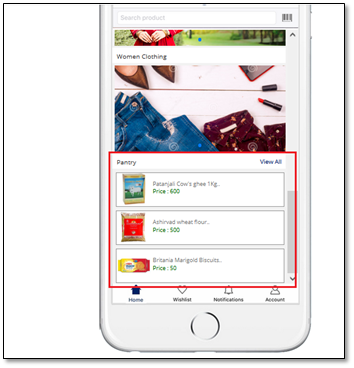
Figure 27: Theme Preview – Default screen > ‘Pantry’ product scroll section’s real images updated
Deleting the Added Sections
- Click
 icon to delete the selected Section.
 - On clicking this icon, the system immediately prompts you with a confirmation message as below:
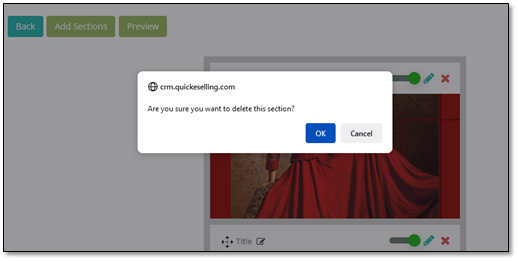
Figure 28: Confirmation message > Delete a Section
- It is mandatory to add minimum three Sections to any theme. In case, there are not enough Sections and you attempt to delete, the system will prompt you with the below warning message.
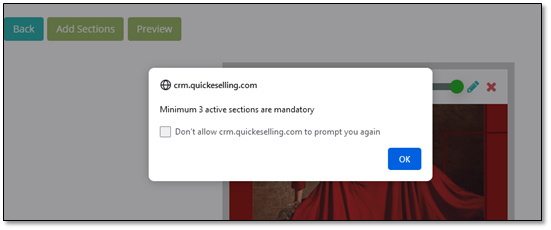
Figure 29: Warning Message
Shuffling the Added Sections
- Once you have added Sections to the default theme, if required, you can even change the position of any Sections.
- Hold the Section that you want to move from the Title area and just drag and drop where you want to place it.
Editing the Added Banner Section
- You can also edit the added Banner Sections.
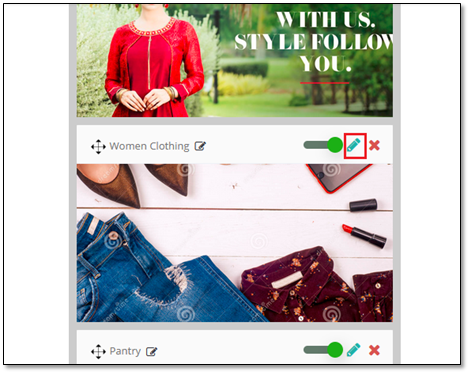
Figure 30: Edit’ button of the Banner Section
- Click the
 Edit icon to open the Edit Medium Size Banner window (or the respective Banner’s edit window).
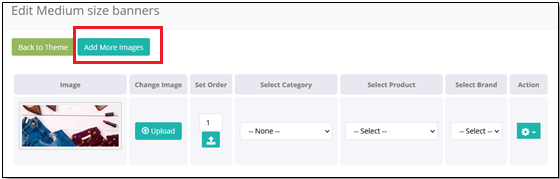
Figure 31: Edit Medium Size Banners’ window
- Click Add More Images button, if you want to add more than one image to this Banner.
Note: Add More Images button appears only for Medium Size Banners. You can add more than one image from here ONLY for Medium Size Banners and these images can be seen as a slide show on the mobile application.
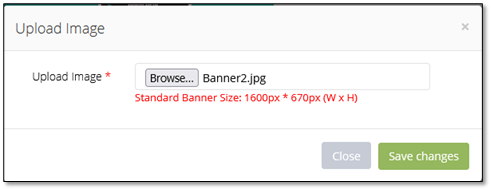
Figure 32: Add More Images button > ‘Upload Image’ window
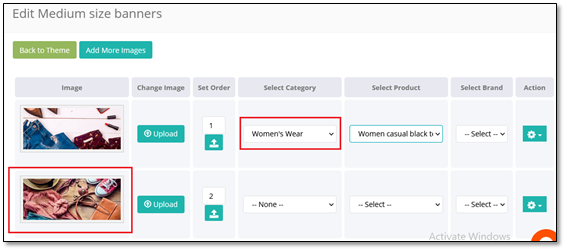
Figure 33: Added 1 more image
- Change Image: Click Upload button to upload another image. The other images (other than the first image you uploaded on the Banner Section), will appear as secondary images and you need to scroll to view them one-by-one as a slide show.
- Sort Order: Click to set or change the sorting order of the image to be visible on the mobile application.
- Select Category: On click to this Banner, if you want to open to a particular Category, then select that Category from this drop down option.
- Select Product: On click to this Banner, if you want to open to a particular Product of a particular Category, then select that Product from this drop down option.
- Select Brand: On click to this Banner, if you want to open directly to a particular Brand, then directly select any brand from this drop down option.
See Figure 35 for more understanding.
- Action: Click the drop down option to view two actions which can be performed on the selected Banner: Delete and Edit URL.
-
- Delete: Click this if you want to delete the selected Banner.
- Edit URL: Click this to open External URL window. If you want that on clicking this Banner, it opens to an external URL then enter that URL here.
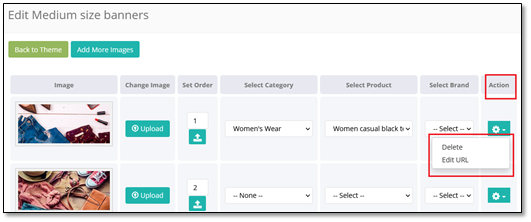
Figure 34: Edit Medium Size Banner > Action
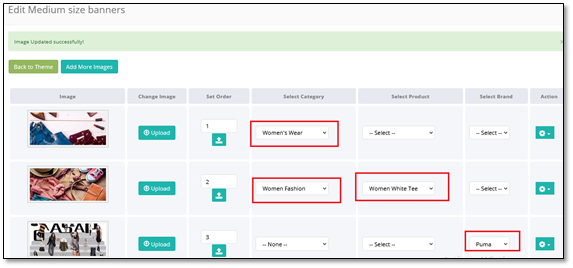
Figure 35: Medium Size Banners > edit > with all possibilities
As shown in the above figure, for the first Banner image, Women’s Wear Category is selected. Hence, on click of this Banner, it will lead you directly to the selected Category, as shown in Figure 36.
Hence, the final output on the Mobile application’s Home page after you enable and publish the selected theme (as per the configurations) will appear as below.
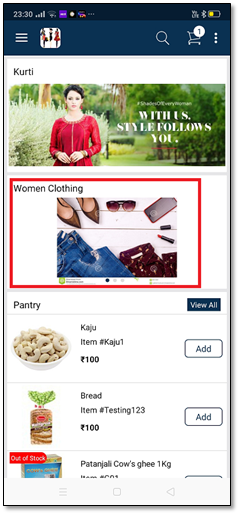
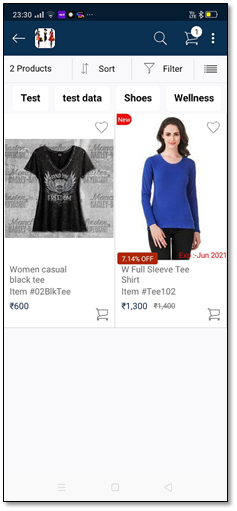
Figure 36: Mobile Application’s Home theme > ‘Women Clothing Banner’ opens to ‘Women’s wear’ Category as per the above configurations
Adding a New Theme
- You can add a theme for the Homepage or Category for a particular time period.
- On the App Theme Setup screen, click the Add New Theme button to add a new theme. This opens the Create New Theme window.
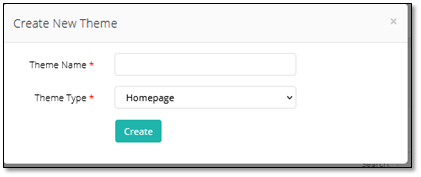
Figure 37: Create a new Theme
- Theme Name: Enter a unique theme name to this new theme.
- Theme Type: Select the theme type from the drop down: Homepage or Category.
- Create: Click the Create button to create/add this new theme.
For example, if you want to add Holi Theme as a Category for Holi festive season,
- Click Add New Theme and enter the Theme Name and Theme Type.
- Click Create.
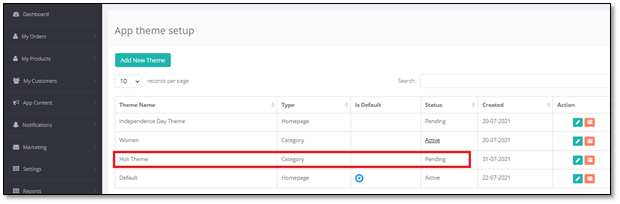
Figure 38: New Category Theme added > Pending status
- As shown in above figure, the Status of this theme is Pending for now, as no sections are added and not enabled/published the theme.
- To make this Category theme active, go to the Update Theme button, add Sections and related images.
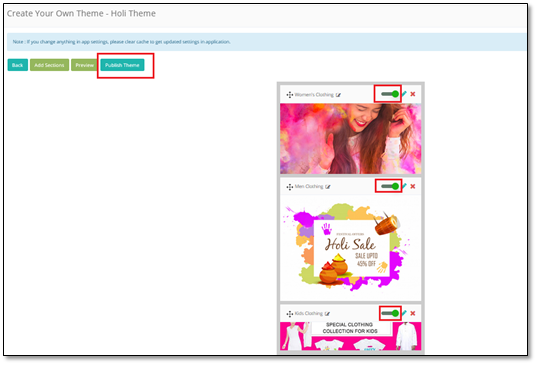
Figure 39: Holi Theme > Added 3 Sections > Enable and click ‘Publish Theme’
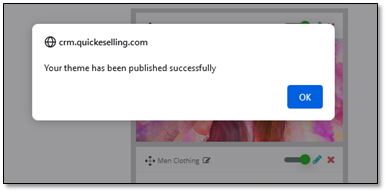
Figure 40: Theme published successfully
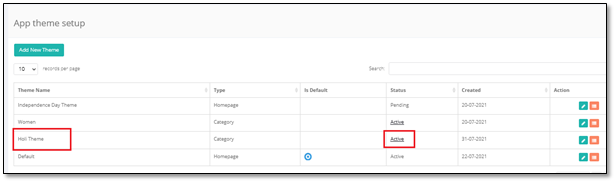
Figure 41: Holi Theme status changed to ‘Active’
As shown in above figures, once you enable and publish the theme, the status of that theme changes to Active.
Editing a Theme
- Click the Edit icon of any theme, which you want to edit (either Theme Name or change the theme type). This opens the Edit New Theme window.
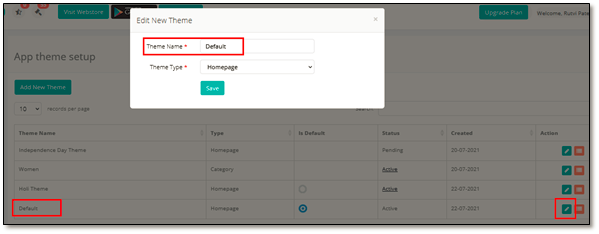
Figure 42: Edit New Theme
Creating a 'Category' Home Page/Creating Sub Home Page
‘Category’ Theme Home Page or also known as Sub Home Page.
On clicking any Banners (Sections) from the main Home page will open another Category Banners, called the ‘Category Theme’ page. This will enable the customer to reach a specific Product Category (can be also called as sub-category) that is assigned to the Banner (of the main Home page) while creating the Category Theme. Hence, this feature leads the customer from the main Home page to another sub-home page or specific category theme.
This topic explains you the steps as to how you can open a sub Home Page or Category Theme page from the main Home Page’s banners.
- First, you will require to create a new theme. Click Add New Theme button, enter the Theme Name and enter Theme Type as Category. For example: Men Category is the newly created Category theme.
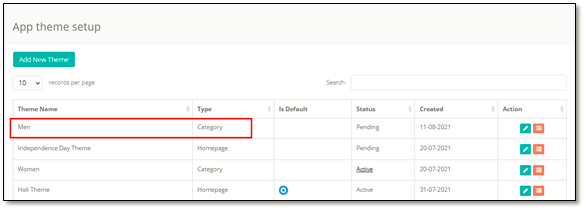
Figure 43: App Theme Setup > New ‘Category’ Theme added > ‘Men’
- Under the Actions column, click Add/Update Theme icon and add sections to this theme.
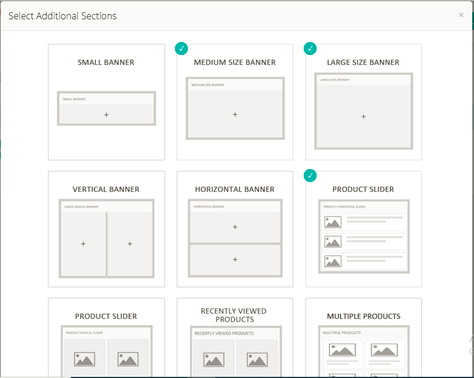
Figure 44: Adding Sections to the ‘Men Category Theme’
-
Now, firstly, you need to assign a desired Product Category (here, Men’s Wear) to the Banner on the main Home page as well as the Category Banners opening from the main App Home page.
- Click the Edit icon of these Banner Sections, to open the Edit page of the respective Banner Section. For example, as shown in below images respectively: Edit Large Banners (of main Home Page) and Edit Medium Size Banners page (of Category Theme page) will open.
- On both pages, go to any Select Category column, select Men’s Wear product category from the drop down option.
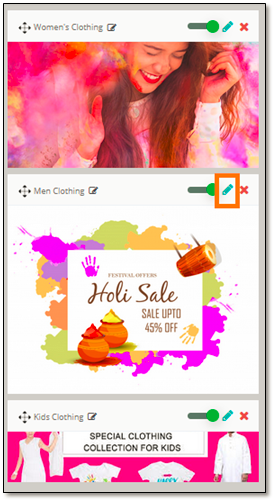
Figure 45: ‘Men’s Clothing’ Banner of main Home Page > to be opened to a sub Home Page
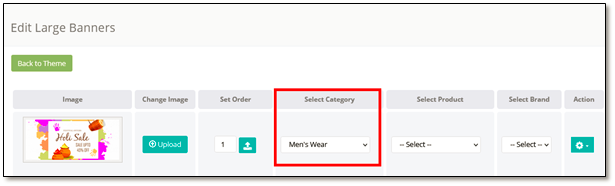
Figure 46: Edit Large Banners (from the main Home Page) > Select Category
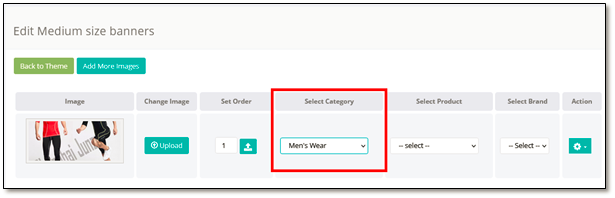
Figure 47: Edit Medium Size Banners > Select Category for this banner
- Save the changes and go back to the theme page.
- Make sure that all these sections/banners are enabled and published to make it active, as shown in below figure. Similarly, link ‘Men’s Wear’ Category with other Banners.
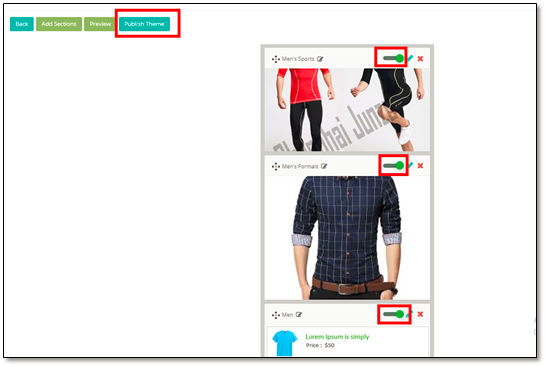
Figure 48: Enable the Sections and Publish the Category Theme
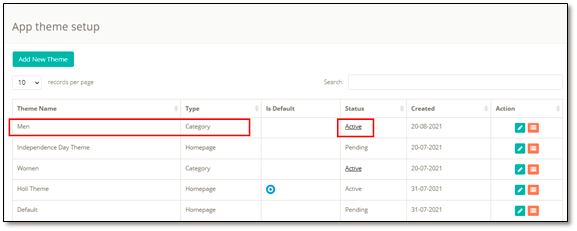
Figure 49: Men Category Theme’s status changed to ‘Active’
- Now, it is important to link the Product Category with the Category Theme. Go to the Product Categories page and select the Category that you have assigned to the banner at the time of creating Category Theme i.e. Men’s Wear and click Edit of this category. This opens the Edit Category page, as shown below.
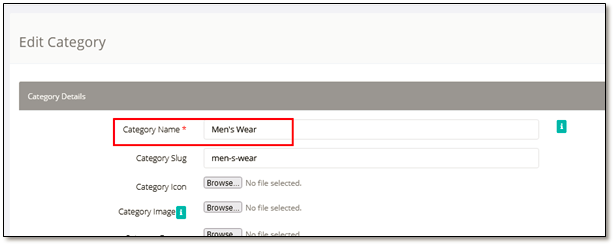
Figure 50: Product Categories > Edit Category window
- Here, select the newly created Category Theme (i.e. Men) in the Category Theme drop down field if you want to open this category on clicking the Theme from the Home page.
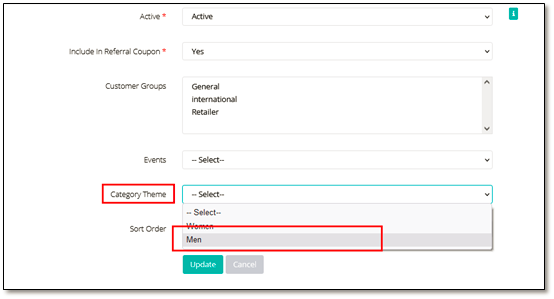
Figure 51: Product Categories > Edit Category > Category Theme
- Hence, the final output in the mobile application appears as below:
On clicking the ‘Men’s Clothing’ banner from the main Home Page > opens the ‘Men’s Wear’ Category Theme Page.
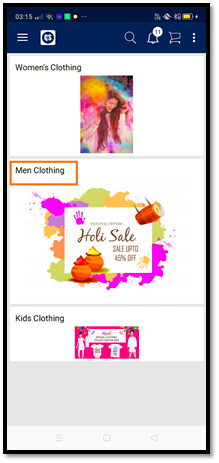
Figure 52: QeS Mobile App > Main Home Page > Click ‘Men Clothing’ Banner/Section
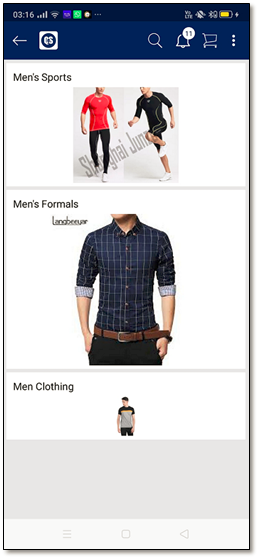
Figure 53: Sub Home Page/Category Theme Page opens (Men’s Wear Category)
Comments
0 comments
Please sign in to leave a comment.